Push Notification Service User Guide
The Syniverse CPaaS omni-channel solution provides the ability for customers to engage their end-users with an in-app mobile engagement experience on both iOS and Android platforms. For more details on how to programmatically integrate your application with our API, please refer to the Omni-Channel API Resource documentation.Syniverse also provides an optional SDK to assist the application developer in adding push notification support to their mobile applications.
Prerequisites
In order to use Push Notification message delivery, the following high-level items are required:
- An account with subscription to Voice & Messaging Service offering. Please refer to the our quick start guide for how to get started
- The mobile application must have the ability to accept push notifications and has to be approved for the same respectively by Apple and Google in their app stores.
- In order to send Push Notification messaging, the application developer must create a Sender ID that includes the application’s push notification details. For more information on what a Sender ID is, please refer to the Omni-Channel User Guide.
- Finally, messages are sent using the Omni-channel API using the push SenderID to a Contact or to a recipient using the push device token:
- "push:{device token}@{application id}@{FCM/APN}. Examples : push:AFE234wdf234sfd8gkh23…aadfg345345@myappid@APN or push:AFE234wdf234sfd8gkh23…aadfg345345@myappid@FCM.
- "psh:{apn/fcm}@{sender-address-ID}@{device-token}. Examples : psh:fcm@34kd09k40tk...rfee44, psh:apn@34kd09k40tk...rfee44.
- Optionally, contact resources can be created with the recipient’s Apple Push Notification (APN) or Firebase Cloud Messaging (FCM) Push Device Token. For more information on how to create a contact with Application token, please see the sample below
Push notification support can be added to a mobile application by either integrating directly with Syniverse omni-channel API or leverage Syniverse provided SDK. The recipients for push notifications can be specified using the device token or using the contact resource.
Provisioning an APN Push Sender ID
Step 1: Retrieve credentials from APN
Go to https://developer.apple.com/account/resources/authkeys/list
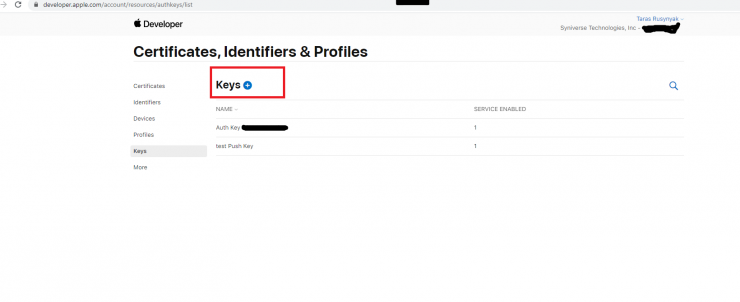
Step 2 : Create Key
-
Click on "Keys +" button.
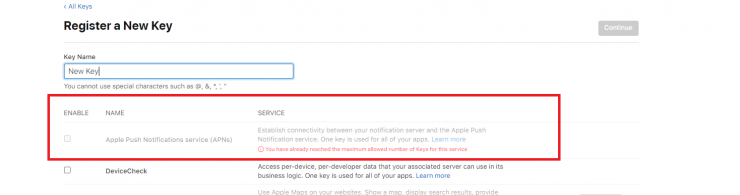
- Check push notifications checkbox and continue key creation.
- Open created key from list of keys:
- Here you can find all necessary information to setup connection
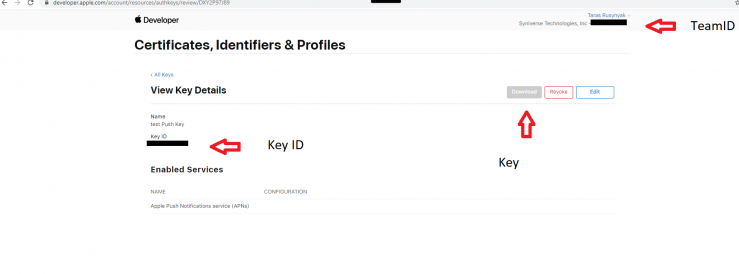
- Copy the values for the following :
- Key ID
- Team ID
- Key
Note: Please save the key file carefully as it can be downloaded only once. It is important to note that the key must be encoded in Base64
Step 3: Create Sender ID
Using API - To create sender for push notifications you will need to perform next request:
curl --request POST 'https://api.syniverse.com/scg-external-api/api/v1/messaging/sender_ids' \
--header 'Authorization: Bearer 2d36a91c-cd62-337a-8d50-491e65f2dbb8' \
--header 'Content-Type: application/json' \
--data-raw  {
    "name":"APN_Token_Test4",
    "class_id":"COMMERCIAL",
    "type_id":"PUSH",
    "address":"com.syniverse.scg.ios.push.demo.token",
    "capabilities":["PSH"],
    "credentials":"
        {
         \"APN\":
               {\"certificate\":\"token:LS0tLS1CRUdJTiBQUklWQVRFIEtFWS0tLS0tCk1JR1RBZ0VBTUJNR0J5cUdTTTQ5QWdFR0NDcUdTTTQ5QXdFSEJIa3dkd0lCQVFRZ3dnMXJ6Y1B5WDZ1QWU5V3UKVkRpZGhoYVh1N2FhTnhpbDlPYUkzMy9pQzdlZ0NnWUlLb1pJemowREFRZWhSQU5DQUFSSEFrMFF6TkN0UUFONwpUeGQ1L2hUa1JaQ0lLZTFzeXVkUGtUeFhHR0gxS1RDQUpEWFM1YWJHcERXdTV0bG1wZ1VxZFVrZXBXQ3pLb2NqCjRpbklEWnVnCi0tLS0tRU5EIFBSSVZBVEUgS0VZLS0tLS0=:G5A9C5LTK7:DXY2P97J89\",
                \"topic\":\"com.syniverse.scg.ios.push.demo\",
                \"environment\":\"sandbox\"
               }
        }"
}
Field Definition
Field Name |
Description |
|---|---|
| capabilities | Specify the messaging capabilities being enabled for the sender being created . For push notifications, specify "PSH" as the capability. |
| address | In the APN Gateway, this is a unique identifier that will serve as a key for the access to APN client. Only one client is allowed for per address. |
| credentials |
Contains the information that is required to setup connection with client application.
|
Create an APN Sender ID in the UI using APN Token.
The following video demonstrates the creation of a Push Notification Sender ID for APN in the Voice and Messaging Console using APN Token. The APN token information would need to be obtained from the Apple Developer Console. If the video does not automatically play, you can reference the video here: https://sdcdocumentation.syniverse.com/application/files/7916/1489/6305/Push-Sender-ID-Creation-APN-Token.mov
Create an APN Sender ID in the UI using APN Certificate.
The following video demonstrates the creation of a Push Notification Sender ID for APN in the Voice and Messaging Console using APN Certificate.The APN certificate information would need to be obtained from the Apple Developer Console. If the video does not automatically play, you can reference the video here: https://sdcdocumentation.syniverse.com/application/files/1316/1489/6312/Push-Sender-ID-Creation-APN-Certificate.mov
Provisioning a FCM Push Sender ID
Step 1: Retrieve credentials from FCM
FCM delivery provider is configured with the help of a JSON configuration file which could be obtained from the Firebase Console. Certificate value can be obtained from the Firebase console under Settings / Service accounts / Generate a new private key button -
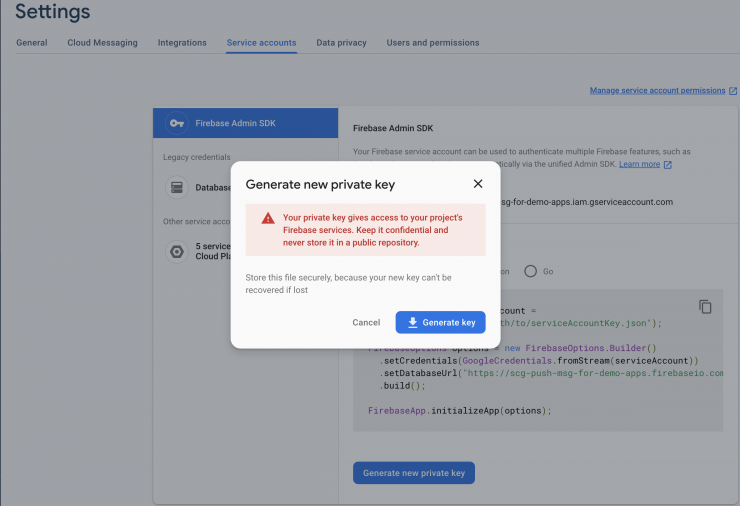
The following configuration JSON file will be downloaded (sensitive data is removed from the current sample):
Note: The configuration file can be downloaded only once form the Firebase console.
Configuration (JSON) file sample :
{
   "type":"service_account",
   "project_id":"demo-application",
   "private_key_id":"abc999abc999abc999abc999abc999abc999abc9",
   "private_key":"-----BEGIN PRIVATE KEY-----\nPRIVATE-KEY-DATA\n-----END PRIVATE KEY-----\n",
   "client_email":"firebase-adminsdk-9abck@demo-application.iam.gserviceaccount.com",
   "client_id":"101010101010101010101",
   "auth_uri":"https://accounts.google.com/o/oauth2/auth",
   "token_uri":"https://oauth2.googleapis.com/token",
   "auth_provider_x509_cert_url":"https://www.googleapis.com/oauth2/v1/certs",
   "client_x509_cert_url":"https://www.googleapis.com/robot/v1/metadata/x509/firebase-adminsdk-9abck%40demo-application.iam.gserviceaccount.com"
}
Step 2: Create Sender ID using API
Using API - To create a Push Notification Sender ID using the API, submit the following request:
curl --request POST 'https://api.syniverse.com/scg-external-api/api/v1/messaging/sender_ids' \
--header 'Authorization: Bearer 2d36a91c-cd62-337a-8d50-491e65f2dbb8' \
--header 'Content-Type: application/json' \
--data-raw '{
    "name": "FCM Sample Sender Address",
    "address": "demo-application",
    "capabilities": ["PSH"],
    "class_id": "COMMERCIAL",
    "type_id": "PUSH",
    "credentials": "{\"FCM\":{\"certificate\":\"{\\\"type\\\":\\\"service_account\\\",\\\"project_id\\\":\\\"demo-application\\\",\\\"client_id\\\":\\\"101010101010101010101\\\",\\\"client_email\\\":\\\"firebase-adminsdk-9abck@demo-application.iam.gserviceaccount.com\\\",\\\"private_key_id\\\":\\\"abc999abc999abc999abc999abc999abc999abc9\\\",\\\"private_key\\\":\\\"-----BEGIN PRIVATE KEY-----\\\\nKEY-CONTENT\\\\n-----END PRIVATE KEY-----\\\\n\\\"}\"}}",
    "start_date": "2020-06-22T21:00:00.000Z",
    "end_date": "2020-06-29T21:00:00.000Z"
}'
Field Definitions
Field Name |
Description |
|---|---|
| capabilities | Specify the messaging capability for the sender being created . For push notifications, specify "PSH" as the capability. |
| address | In the FCM Gateway, a unique identifier will be provided that will serve as a key for the access to FCM client. Only one client is allowed per address. |
| credentials | Contains credential information that is required to setup the connection with application. |
Create a FCM Sender ID in the UI
The following video demonstrates the creation of a Push Notification Sender ID for FCM in the Voice and Messaging Console. The JSON configuration file would need to be obtained from the Firebase Console. If the video does not automatically play, you can reference the video here: https://sdcdocumentation.syniverse.com/application/files/1016/1489/6288/Push-Sender-ID-Creation-FCM.mp4
Sending a Push Notification
There are several options available for sending a Push Notification :
- Send using device application token
- Send using contact resource
In order to send a push notification, the /messageRequest or /messages resource should be used. Following key fields would need to be provided in the request being submitted:
- "from" will be a "PUSH" type Sender ID or a Channel that contains a "PUSH" type Sender ID.
- "to" will be one of the following
- One or more recipients using the device token via application ID (Example: push:{device-token}@{application-id}@APN OR push:{device-token}@{application-id}@FCM.)
- One or more recipients using the device token via sender ID (Example : push:apn@{sender-id}@{device-token} OR push:fcm@{sender-id}@{device-token}.)
- One or more recipients using their "contact" IDs. (Example : contact:Dwer8fwels809reser)
- One or more recipients with the "contact group" (Example : group:Aertyuio3476rvtb).
- "body" will contain any text that should be presented as part of the push notification. (Optional)
- "attachments" will contain the attachment ID of an Image, Audio or Video file. (Optional). The following content types are supported:
- audio/ogg
- audio/webm
- audio/mp4
- audio/mpeg
- image/png
- image/jpeg
- image/gif
- video/mpeg
- video/ogg
- video/mp4
- video/webm
- "options" will contain additional information about the push notification being delivered and will be specific to the platform: iOS (APN) or Android (FCM) of the recipient's device.
- notification type (push:notify_type).
- badge management (push:badge).
- sound management (push:sound).
- body extensions like deep links or application data.
Please refer to the Omni-Channel API sample requests for sending push notifications.
Sending a Push Notification using the UI
The video demonstrates sending a push notification using the Voice and Messaing Console. If the video does not automatically play, you can reference the video here: https://sdcdocumentation.syniverse.com/application/files/9216/1463/5884/Send_Message.mp4
Push Notification Delivery Status
Push notification delivery status (Delivery Receipts) can be consumed by setting up web hooks via Syniverse Events Manager. For more information on setting up a webhook, visit our webhook knowledge base article on this.
Once your webhook as been setup using Delivery configuration, you now need to subscribe to the Event topic "SCG-Message"
- Log in to SDC portal
- Select Event Manager
- Navigate to Subscription from the Event Manager drop down menu
- Select New Subscription
- In the Topic field, select "SCG-Message" from the drop down
- In the Event Type field, select "all types" which gives you access to all voice related events, or if you want a particular event you can select it from the drop down. ( See next section for more information on Message related events)
- Next, select the Delivery Configuration (Webhook url) you've already setup
- Create a matching criteria if you want ( See SCG Knowledge Base for more information on how to use the matching criteria).
- Select a Start Date and optionally an end date if you have one.
- Click "Create" to complete your Event subscription.
SCG-Message Service Topic Details
The SCG-Message topic is composed on various event types that can be triggered depending on the type of event status the user is looking to capture.
Below are a list of supported event types in the SCG-Message topic
- message_request_state_change : Usually invoked when the Direct Message API is used to send messages
(Validation Type = Strict)
| Name | Type | Mandatory | Example |
|---|---|---|---|
| message_id | Text | Yes | "ixuMLKPUfDheho6omdDjb4" |
| message_request_id | Text | No | "bcdi8K51iqHFP8Luv2rBC6" |
| attachment_ids | Text | No | |
| mt_price | Decimal | No | "$0.0005" |
| mo_price | Decimal | No | |
| previous_state | Text | Yes | "SENT" |
| external_id | Text | No | |
| has_attachment | Boolean | No | "false" |
| to_address | Text | No |
""push:fZOlBfT1s2g:APA91bHpcEaoyFGcjKBg9SxZSbiLzVUMBNA- O6wrOk8KXadcSTYHLTHwynunBLMfus45-QINT54TuFVgUg5HeVdE9 LwZ3M79ehcjKwX8XDN2DMG3p6AoMED-2gxdN9_QSK5X6D1U4ETg @com.syniverse.scg.push.demo.app@FCM"" |
| from_address | Text | No | "com.syniverse.scg.push.demo.app" |
| number_type | Text | No | |
| reason_description | Text | Yes | "SUCCESS" |
| application_id | Integer | No | |
| reason_code | Text | Yes | "200" |
| sender_id_alias | Text | No | "yhH4RWDQiAKQ6UBDJEpwi5" |
| sender_id_id | Text | No | "yhH4RWDQiAKQ6UBDJEpwi5" |
| external_message_request_id | Text | No | |
| new_state | Text | Yes | "DELIVERED" |
| company-id | Integer | No | |
| fragments_count | Integer | No | 1 |
Example:
{
  "topic": "SCG-Message",
  "attempt": 1,
  "event": {
    "fld-val-list": {
      "previous_state": "QUEUED",
      "message_request_id": "bcdi8K51iqHFP8Luv2rBC6",
      "message_id": "ixuMLKPUfDheho6omdDjb4",
      "to_address": "push:fZOlBfT1s2g:APA91bHpcEaoyFGcjKBg9SxZSbiLzVUMBNA-O6wrOk8KXadcSTYHLTHwynunBLMfus45
                    -QINT54TuFVgUg5HeVdE9LwZ3M79ehcjKwX8XDN2DMG3p6AoMED-2gxdN9_QSK5X6D1U4ETg@com.syniverse.scg.push.demo.app@FCM",
      "has_attachment": false,
      "reason_description": "SUCCESS",
      "application_id": 1714,
      "reason_code": "200",
      "sender_id_alias": "yhH4RWDQiAKQ6UBDJEpwi5",
      "company-id": 1519,
      "sender_id_id": "yhH4RWDQiAKQ6UBDJEpwi5",
      "external_message_request_id": "",
      "new_state": "SENT",
      "fragments_count": 1,
      "from_address": "com.syniverse.scg.push.demo.app",
      "mt_price": 0.00005
    },
    "evt-tp": "message_state_change",
    "timestamp": "2019-10-27T17:51:42.048Z"
  },
  "event-id": "yewU4el5QNKGOAB8OhRlIA"
}
Creating a Push Contact and Contact Application Token
Contacts may be used to store the Push Notification Device Tokens for each end user. This way, the calling application can simply specify the end user’s unique Id in order to send push notifications to that user. In order to store Push Device Token information in a contact the following steps are used:
Step 1: Create an contact for the end user if one does not already exist.
curl --request POST 'https://api.syniverse.com/scg-external-api/api/v1/contacts \
--header 'Authorization: Bearer 2d36a91c-cd62-337a-8d50-491e65f2dbb8' \
--header 'Content-Type: application/json' \
-data_raw {
    "first_name": "testAPNSend1",
    "primary_mdn": "+380673379221"
}
Step 2: Create a contact_application_token resource for this particular contact. This will include the Push Device Token in the "token" field
curl --request POST 'https://api.syniverse.com/scg-external-api/api/v1/contacts/jwTcvFe1DCWuHQ7y9G9lM2/application_tokens \
--header 'Authorization: Bearer 2d36a91c-cd62-337a-8d50-491e65f2dbb8' \
--header 'Content-Type: application/json' \
--data_raw {
    "sender_id_address":"com.syniverse.scg.ios.push.demo",
    "message_delivery_provider":"APN",
    "token":"b27fe514f9f7fae149491cdd101f917ff1ec6249ee9f33f0649070f48cc8d860"
}

or

curl --request POST 'https://api.syniverse.com/scg-external-api/api/v1/contacts/jwTcvFe1DCWuHQ7y9G9lM2/application_tokens \
--header 'Authorization: Bearer 2d36a91c-cd62-337a-8d50-491e65f2dbb8' \
--header 'Content-Type: application/json' \
--data_raw {
    "sender_id_address":"com.syniverse.scg.push.demo",
    "message_delivery_provider":"FCM",
    "token":"etSsTpXCSCGdOMc6AHtb7e:APA91bGeJk7hwCPfcir5ynmKiMSplJcpEwy0ykOYv86ocFhTJzav37ZCILAFEvaTDHseHUFbJD751r8tozRmAHHQKy-smZVjrXG2QCT5me3gOsqClqn_11JGXBGvEXOCmhBjkrRYo8v-"
}
Field Definition
Field Name |
Description |
|---|---|
| sender_id_address | Needs to match address field of sender id |
| token | APN/FCM Token of the application |
| message_delivery_provider |
APN or FCM |
The following video demostrates how the contact creation and token generation can be done in the SCG Console.
Defining Contact
Create a contact in the UI
The video demonstrates creation of a contact reciepient for a push notification and an application token in the Voice and Messaging Console.
Using Syniverse Mobile Push SDK
Syniverse Mobile Push SDK simplifies integration with the Omni-channel API to send push notification to the recipient's iOS or Android devices. The following functionality is supported by the SDK:
- Registration and Unregistration API to help register/unregister the instaleld application on the recipient's device and obtain the access token including handling of failed registration requests.
- Token rotation for APN/FCM API to help register/unregister token during token rotation.
- Callback API to submit DELIVERED/READ/CLICKTHRU status updates to the platform which can be communicated via web hooks to the client application.
- Reset Badge API to reset badge count in APN/FCM.
- Attachment API to help download media attachments from the platform (including error handling)
Please refer to the Push Notification Mobile SDKs page for information on integrating the Syniverse Push Notification Mobile SDKs into your mobile applications.